Essential WordPress Settings After Install (2026 Guide)
You just installed WordPress. Congrats! But before you start picking themes, installing plugins, or writing your first blog post, there are a handful of settings that need your attention right now. I have seen too many beginners skip this step and then spend hours fixing problems that could have been avoided with ten minutes of configuration.
These settings live under Settings in your WordPress sidebar, and most of them you will only touch once. But getting them right from the start affects your SEO, your site speed, and how professional your site looks to visitors and search engines alike. If you just finished installing WordPress, this is your very next step.
1. Site Title and Tagline
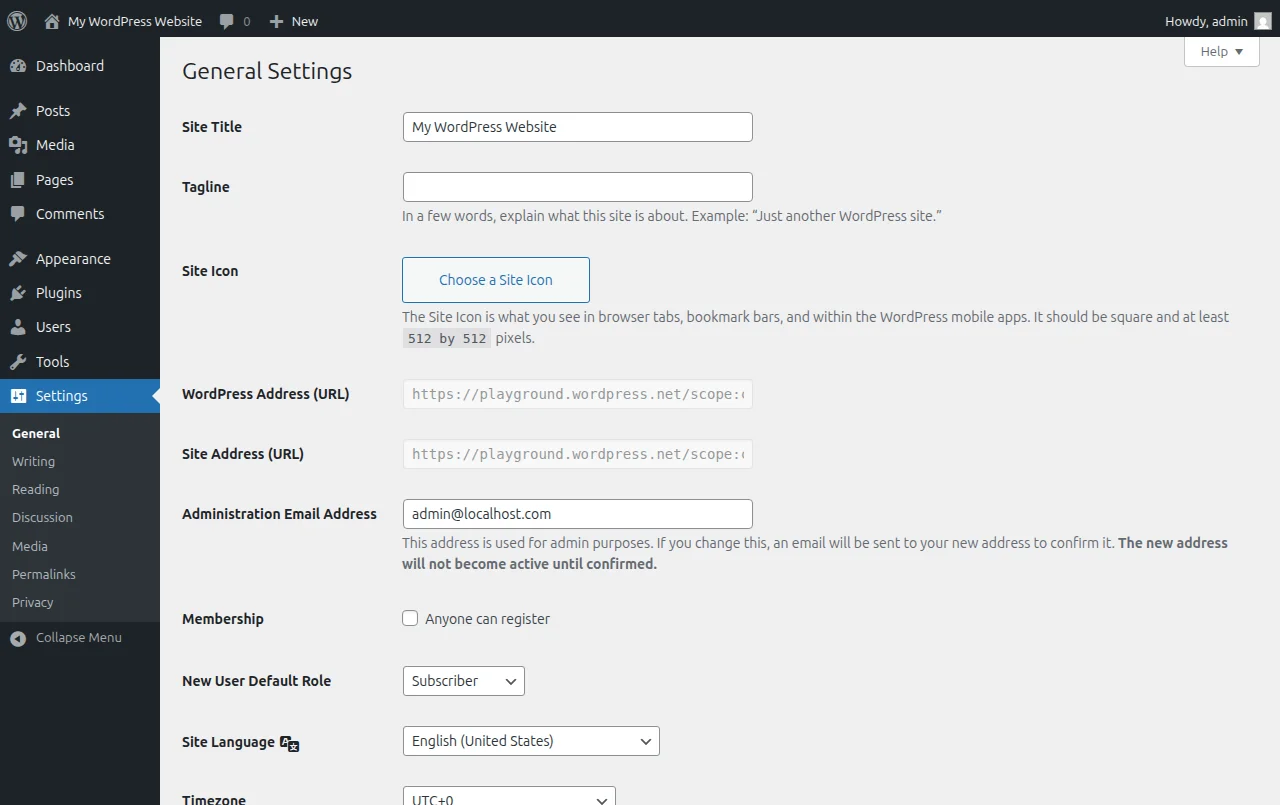
Go to Settings > General. The first two fields you see are your Site Title and Tagline. Your site title appears in browser tabs, search engine results, and often in your site header. Set it to the actual name of your website.
The tagline is more important than people realize. WordPress sets it to "Just another WordPress site" by default, and I cannot tell you how many live websites still have that showing in Google results. Change it to a short, descriptive phrase about what your site does — something like "WordPress tutorials for complete beginners" or "Helping small business owners build their first website." Or just leave it blank. Anything is better than the default.
2. WordPress Address and Site Address
While you are on the General Settings page, check the two URL fields: WordPress Address (URL) and Site Address (URL). Both should start with https://, not http://. If your hosting provider set up an SSL certificate during installation (most do automatically now), this should already be correct. If you see http://, update both fields to https://. This is a basic security and SEO requirement in 2026 — Google has been using HTTPS as a ranking signal for years.
Warning: Be very careful when editing these URLs. A typo here can lock you out of your WordPress dashboard entirely. Double-check before saving.
3. Timezone, Date, and Time Format
Scroll down on the same General Settings page and set your Timezone to your local city or UTC offset. WordPress uses this for scheduling posts, displaying dates on your content, and running background tasks like scheduled backups. If you leave it on the default (UTC+0) and you are in Amsterdam, your post scheduled for 9 AM will actually publish at 9 AM UTC — which is 10 AM or 11 AM your time depending on daylight saving.
I always set the date format to something clean and unambiguous. The default works fine for most people, but check that it matches what your audience expects. European readers are used to day/month/year, while American readers expect month/day/year.
4. Permalink Structure — The Most Important Setting
This is the single most critical setting on this entire list, and you need to change it right now. Go to Settings > Permalinks.
By default, WordPress generates URLs like yourdomain.com/?p=123. That is ugly, tells nobody what the page is about, and is genuinely bad for SEO. Search engines prefer descriptive URLs because they use the words in your URL as a relevance signal. And visitors are more likely to click a link that says /wordpress-settings-after-install than one that says /?p=47.
Select the "Post name" option, which creates URLs like yourdomain.com/your-post-title. Then click Save Changes. I have used this structure on every single WordPress site I have built, and it is what virtually every SEO expert recommends.
Why you must do this now: If you change your permalink structure after publishing content, every existing URL on your site changes. Links that people shared, pages Google indexed, bookmarks visitors saved — all of them break. WordPress does not set up automatic redirects from old URLs to new ones. I have seen bloggers change their permalinks six months in and lose half their search traffic overnight. Do it now while you have zero content, and you will never have to worry about it.
5. Reading Settings
Go to Settings > Reading. The key decision here is what your homepage displays. You have two choices:
- Your latest posts — Your homepage shows a reverse-chronological list of blog posts. Good for blogs.
- A static page — Your homepage is a fixed page you design. Good for business sites, portfolios, or any site where you want full control over what visitors see first.
If you are building a blog, the default (latest posts) is fine for now. If you are building a business site or any kind of structured website, switch to a static page once you have created your homepage. You can always change this later.
One more thing on this page: Search engine visibility. There is a checkbox that says "Discourage search engines from indexing this site." Make absolutely sure this is unchecked. If you accidentally leave this on, Google will not index your site at all. I have personally helped three people troubleshoot why their site was not appearing in Google, and every single time it was this checkbox. Some hosting providers check this box during installation so your unfinished site does not get indexed. That is thoughtful — but you need to uncheck it before you launch.
6. Discussion Settings (Comments)
Go to Settings > Discussion. This controls how comments work on your site. The defaults are mostly fine, but there are a few things I always change:
- Enable comment moderation — Make sure "Comment must be manually approved" is checked, or at minimum keep the setting that holds comments with links for moderation. Comment spam is relentless, and you do not want garbage links appearing on your site automatically.
- Disable pingbacks and trackbacks — Uncheck "Allow link notifications from other blogs (pingbacks and trackbacks)." These were useful in 2005. In 2026 they are basically just a spam vector.
- Avatars — Gravatar is enabled by default, which means commenters who have a Gravatar account will show their profile picture. This is fine. No changes needed here.
If you do not want comments on your site at all, uncheck "Allow people to submit comments on new posts" at the top. You can always re-enable this later.
7. Media Settings
Go to Settings > Media. WordPress automatically generates multiple sizes of every image you upload: a thumbnail, a medium size, and a large size. The defaults (150px, 300px, 1024px) are reasonable and I typically leave them as-is. But here is the one thing I always check: make sure "Organize my uploads into month- and year-based folders" is checked. This keeps your uploads directory organized as your site grows. Without it, every image goes into one flat folder, which gets messy fast once you have hundreds of images.
8. Privacy Page
Go to Settings > Privacy. WordPress has a built-in privacy policy page generator. If you are running any kind of website that collects data — and if you have a contact form, analytics, or comments enabled, you are collecting data — you need a privacy policy. Click "Create New Page" and WordPress generates a template you can customize. It is not a replacement for legal advice, but it is a solid starting point and much better than having nothing. GDPR, CCPA, and similar regulations are real, and they apply even to small personal blogs.
9. User Profile Settings
This one is not under Settings — go to Users > Profile instead. A few things to update here:
- Display name — By default, WordPress may display your username publicly. Change this to your actual name or whatever you want readers to see as the author of your posts. For security, your display name should be different from your login username.
- Biographical info — Add a short author bio. Many themes display this at the bottom of blog posts, and it helps build trust with readers.
- Admin color scheme — This is purely cosmetic, but if you spend a lot of time in the dashboard, pick a color scheme you enjoy looking at. I use the "Midnight" scheme because I find the dark sidebar easier on the eyes.
10. Delete Default Content
This is not technically a "setting," but do it now while you are configuring everything. WordPress ships with a sample post called "Hello World!," a "Sample Page," and a default comment. Delete all three:
- Go to Posts > All Posts, hover over "Hello World!," click Trash.
- Go to Pages > All Pages, hover over "Sample Page," click Trash.
- Go to Comments, hover over the default comment, click Trash.
This takes 30 seconds. You do not want placeholder content on your live site, and you definitely do not want Google indexing a page that says "This is an example page."
Quick Checklist
Here is everything from this guide in one scannable list. Work through it from top to bottom right after installing WordPress:
- Set your site title and change the tagline from the default
- Verify both URLs use HTTPS
- Set your timezone to your local city
- Change permalinks to "Post name" (most important!)
- Choose homepage display (latest posts or static page)
- Uncheck "Discourage search engines from indexing this site"
- Enable comment moderation, disable pingbacks
- Verify media upload organization is enabled
- Create a privacy policy page
- Update your user profile and display name
- Delete the default post, page, and comment
The whole process takes about ten minutes, and you only have to do it once. After this, you are ready to start building your actual website.
What Comes Next
With your WordPress settings properly configured, you have a solid foundation to build on. If you are following the learning path, the next step is choosing a theme and making your site look the way you want. Head over to How to Make a WordPress Website for the complete walkthrough, or go back to How to Choose a Domain Name if you skipped that step.
Getting these settings right is one of those small things that separates a well-built WordPress site from one that is going to cause problems down the road. You have done the boring-but-important work. Now the fun part starts.
Frequently Asked Questions
What is the single most important WordPress setting to change after installation?
Your permalink structure, hands down. Go to Settings → Permalinks and switch from the ugly default (?p=123) to "Post name." This creates clean, readable URLs like /best-wordpress-themes/ that both humans and search engines love. Change this before you publish anything, because changing permalinks later breaks all your existing links and tanks your SEO overnight.
Which permalink structure should I use for SEO?
"Post name" is the best choice for the vast majority of WordPress sites. It produces short, keyword-rich URLs that are easy to share and perform well in search results. The only exception is high-volume news sites that publish dozens of articles per day — they sometimes use "Day and name" to avoid slug collisions. For a regular blog or business site, stick with "Post name" and never look back.
Should I check the "Discourage search engines from indexing this site" box?
Only if your site is genuinely under construction and you do not want Google indexing half-finished pages. This checkbox adds a noindex meta tag that tells search engines to ignore your entire site. The critical thing is to uncheck it before you launch — I have seen people forget this and wonder for months why they are getting zero organic traffic. If you are unsure, leave it unchecked; there is no harm in Google seeing a work-in-progress site.
Do I need to set my timezone in WordPress?
Yes, and it matters more than you might think. Your timezone setting controls when scheduled posts go live, when comments are timestamped, and how your dashboard displays dates. Go to Settings → General and pick your city (not just a UTC offset) so WordPress also handles daylight saving time automatically. I have seen scheduled posts go live an hour early or late because someone picked "UTC+1" instead of "Amsterdam."
Should I allow comments on my WordPress site?
It depends on your goals. Comments can build community and add fresh content that search engines like, but they also require constant moderation to fight spam. My recommendation for most new sites: keep comments enabled but turn on comment moderation under Settings → Discussion and install Akismet for spam filtering. If you run a business site with no blog, disabling comments entirely is perfectly fine — you will not miss them.
Can I change these settings later or will it break my site?
Most settings can be changed at any time without problems — things like your tagline, timezone, date format, and comment preferences are safe to tweak whenever you want. The big exception is permalinks: changing your URL structure after publishing content will break all existing links unless you set up proper 301 redirects. That is why getting permalinks right from the start is so important.

Written by Marvin
Our team tests and reviews WordPress products to help beginners make confident choices.
Learn more about our team →You might also like
7 Essential Plugins Every WordPress Site Needs (2026)
Don't install 30 plugins. Start with these 7 that every WordPress site actually needs — for security, SEO, speed, and backups.
postHow to Choose & Install a WordPress Theme (Beginner's Guide)
Your theme controls how your site looks. Here's how to pick the right one and install it in under 5 minutes.
postWordPress Pre-Launch Checklist — 15 Things Before Going Live
Before you share your site with the world, run through this 15-point checklist to make sure everything is ready.
postCreating Your First WordPress Pages & Posts (Step-by-Step)
Pages vs posts — what's the difference and when to use each? Here's how to create both using the WordPress block editor.