How to Install WordPress — The Complete Step-by-Step Guide
I remember the first time I installed WordPress back in 2006. You had to manually create a MySQL database through phpMyAdmin, download a ZIP file from wordpress.org, upload every single file via FTP (which took forever on my connection), edit wp-config.php by hand to add your database credentials, and then cross your fingers when you loaded the installer in your browser. The whole process took the better part of an afternoon, and that was if everything went right on the first try.
These days? You can have a fully working WordPress site in about five minutes. Most hosting companies have one-click installers that handle everything behind the scenes — database creation, file setup, configuration, all of it. It's genuinely one of the easiest things you'll do in the entire process of building a website. But there are still a few things that trip up beginners, and the steps you take in the first ten minutes after installation matter more than people realize.
In this guide I'll walk you through the entire process — from clicking "Install" to having a properly configured WordPress site ready for content. I'll cover the easy one-click method that I recommend for 99% of people, the manual method for those who like to understand what's happening under the hood, and the critical settings you need to change immediately after installation. I've installed WordPress hundreds of times across every major host, so I know exactly where people get stuck.
If you haven't picked a hosting provider yet, start with my WordPress hosting guide — you'll need hosting before you can install anything. And if you're not sure what WordPress actually is or why it's the right choice, my What Is WordPress overview covers the basics.
Before We Start — What You Need
Installing WordPress requires exactly three things, and you might already have all of them. First, you need a hosting account — this is the server where your WordPress site will live. If you followed my hosting recommendation, you're already set. Most hosting plans from companies like Bluehost, SiteGround, and Hostinger include WordPress pre-installed or offer a one-click installer, and many include a free domain name for the first year as well.
Second, you need a domain name — your website's address (like zerotowp.com). If your host included a free domain, you already have this. If not, check out my guide on how to choose a domain name for tips on picking a good one and where to register it. Don't overthink this step — your domain matters, but your content matters a whole lot more.
Third, you need about 15 minutes of uninterrupted time. That's it. Seriously. The actual installation takes 2-3 minutes, but you'll want another 10-12 minutes to configure the essential settings I'll show you. Grab a coffee, close your other tabs, and let's do this.
One more thing before we dive in: have a notepad handy (physical or digital, I don't care which). You'll be creating an admin username and password during setup, and you absolutely need to write these down somewhere safe. I've helped more people recover lost WordPress passwords than I can count, and it's always a hassle that could have been avoided with 30 seconds of note-taking.
Method 1 — One-Click Install (Recommended for Beginners)
This is how I install WordPress these days, and it's how I recommend you do it too. Every major hosting company offers some version of a one-click installer, and while the exact interface varies from host to host, the process is fundamentally the same everywhere. I'll walk you through the general steps and point out where things might look different depending on your provider.
Step 1: Log In to Your Hosting Dashboard
After signing up for hosting, you'll have received a welcome email with your login credentials. Head to your hosting provider's website and log in. What you see next depends entirely on which host you chose. Bluehost has a custom dashboard that's designed specifically for WordPress users — it's clean and beginner-friendly. SiteGround uses their "Site Tools" panel, which is more feature-rich but takes a minute to get oriented. Hostinger uses their custom "hPanel" interface. And some smaller hosts still use cPanel, the traditional hosting control panel that's been around since the late '90s and looks like it.

Don't be intimidated by all the options you see. You only need to find one thing right now: the WordPress installer. Everything else can wait.
Step 2: Find the WordPress Installer
Here's where it gets slightly different depending on your host. On Bluehost, WordPress is often already installed when you finish signing up — they do it automatically during the onboarding process. If that's the case, you can skip ahead to Step 5. On SiteGround, look for "WordPress" in the Site Tools sidebar, then click "Install & Manage." On Hostinger, it's under "Website" in the left menu, then "Auto Installer."
If your host uses cPanel (you'll recognize it by its grid of colorful icons), look for "Softaculous Apps Installer" or "WordPress" in the "Software" section. Softaculous is the tool that cPanel uses behind the scenes to handle one-click installations, and it works well — it's just wrapped in a slightly dated interface. Some cPanel setups also have a dedicated "WordPress Manager by Softaculous" icon, which is even more streamlined.
If you genuinely cannot find the installer, search your dashboard for "WordPress" — most hosting panels have a search bar. And if all else fails, contact your host's support chat. They do this all day long and can either point you to the right place or install it for you in about two minutes.
Step 3: Fill In Your Site Details
Once you've found the installer, you'll be asked to provide a few pieces of information. The exact fields vary by host, but you'll almost always see these:
- Domain — Select which domain you want to install WordPress on. If you only have one domain, this is already selected for you.
- Site Title — Your website's name. Don't worry about getting this perfect — you can change it anytime from the WordPress dashboard. Something like "My WordPress Site" or your actual site name is fine for now.
- Admin Username — This is what you'll use to log in to WordPress. Pick something unique to you.
- Admin Password — Make this strong. A mix of uppercase, lowercase, numbers, and symbols. At least 12 characters.
- Admin Email — Use a real email address you check regularly. WordPress sends important notifications here — update alerts, password resets, comment notifications.
WARNING: Never use "admin" as your username. I cannot stress this enough. "admin" is the first username that bots try when they attempt to brute-force their way into WordPress sites. I've personally cleaned up dozens of hacked WordPress sites over the years, and a shocking number of them were using "admin" as their login name. Use your first name, a nickname, your email prefix — anything but "admin." This one change eliminates an entire category of attacks.
Pro tip: Use a password manager like Bitwarden (free) or 1Password to generate and store your admin password. If you don't use a password manager yet, at least write the password down on paper and put it somewhere you won't lose it. The "I'll remember it" approach has a roughly 0% success rate over any meaningful period of time.
Step 4: Click Install and Wait
Once you've filled in your details, click the "Install" button (or "Submit," "Complete Setup," whatever your host calls it). The installer will now create a MySQL database, copy all the WordPress core files, configure the wp-config.php file, and run the WordPress setup — all automatically. You'll see a progress bar or a spinning wheel, and the whole process typically takes somewhere between 30 seconds and 3 minutes depending on your host.
When it's done, you'll get a confirmation screen with your login URL. This is almost always yourdomain.com/wp-admin — that's the address you'll use every single time you want to log in to your WordPress dashboard. Bookmark it now. Some hosts also send a confirmation email with these details, which is a nice backup.
If the installer seems to hang for more than 5 minutes, don't click "Install" again — that can create duplicate installations. Instead, open a new tab and try going to yourdomain.com/wp-admin. If the login screen appears, the installation worked and the progress bar just didn't update. If you get an error, contact your host's support.
Step 5: Log In to Your New WordPress Site
Navigate to yourdomain.com/wp-admin in your browser. You'll see the WordPress login screen — a simple form with username and password fields and the WordPress logo. Enter the admin credentials you created during installation and click "Log In."
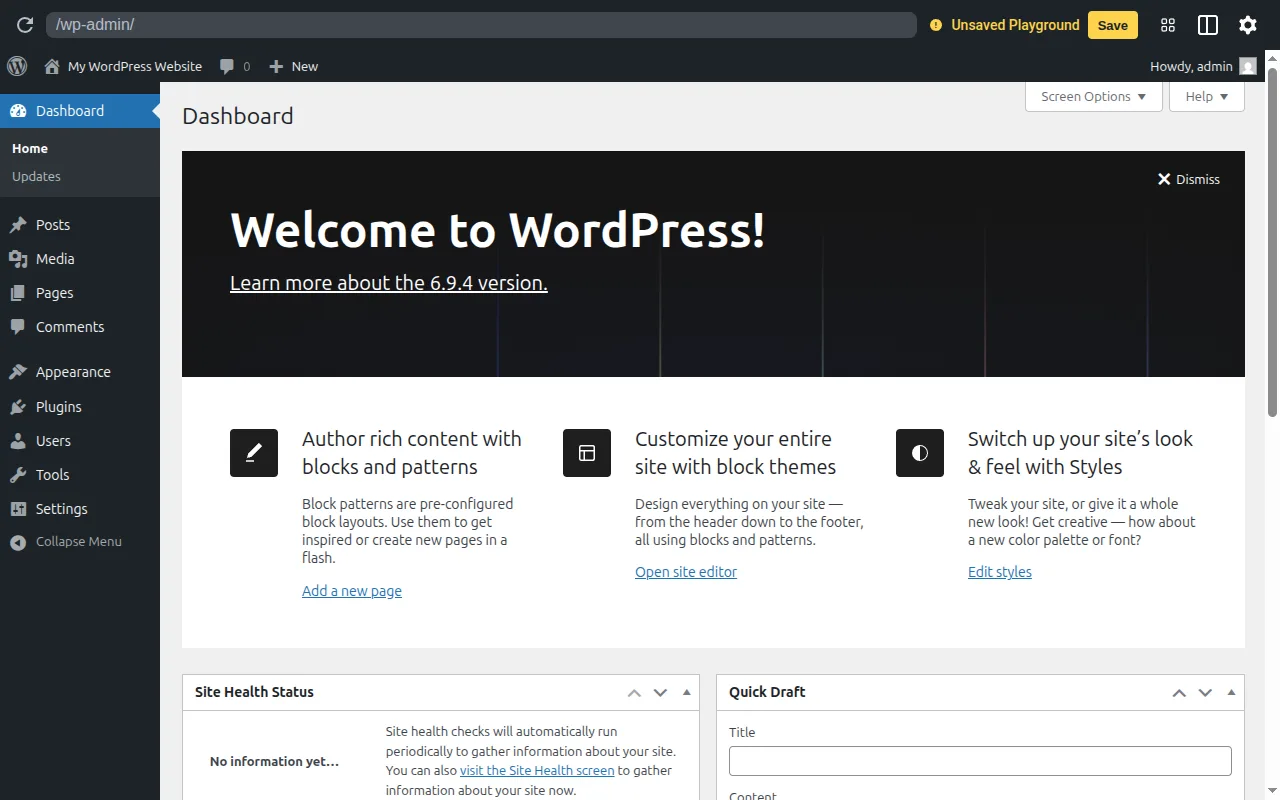
Welcome to your WordPress dashboard. This is mission control — where you'll create content, change your site's appearance, install plugins, and manage everything. Take a moment to look around. On the left side you'll see a vertical menu with items like "Posts," "Pages," "Appearance," "Plugins," and "Settings." At the top you'll see a toolbar with your site name (click it to visit your live site) and your user profile. In the main content area, there's usually a welcome panel with quick-start links and an "At a Glance" box showing your site's stats.
Congratulations — you now have a working WordPress website. But don't start publishing content yet. There are a handful of critical settings you need to configure first, and getting them right now will save you real headaches later. This next part trips up a lot of beginners, so pay attention.
Method 2 — Manual Installation (For the Curious)
I'm including this section not because I think you should manually install WordPress — you almost certainly shouldn't — but because understanding the process helps you troubleshoot problems and gives you a better mental model of how WordPress actually works. Think of this as the "what's happening behind the curtain" section.
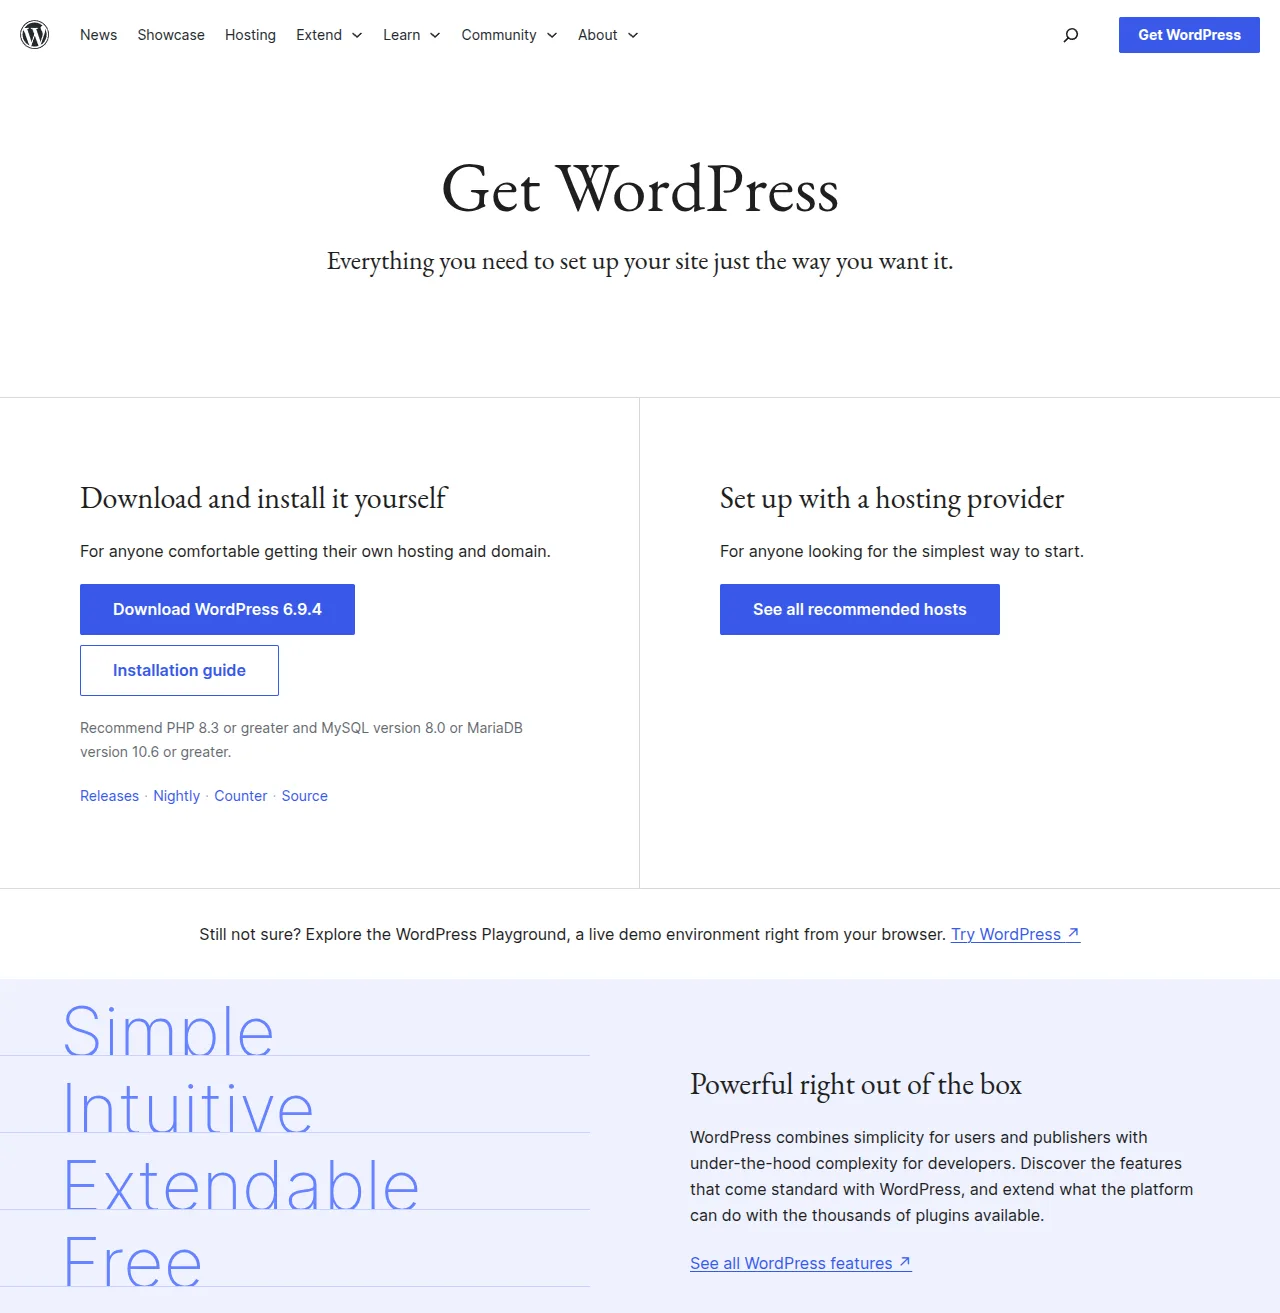
Here's what a manual installation involves. First, you download the latest WordPress ZIP file from wordpress.org. The file is only about 25MB — WordPress core is remarkably lightweight. Next, you connect to your server using an FTP client like FileZilla and upload all the extracted files to your web root directory (usually called public_html or www). Then you log into your hosting control panel and create a new MySQL database along with a database user, making sure to give that user full permissions on the database. After that, you rename the file wp-config-sample.php to wp-config.php and edit it to add your database name, database username, database password, and database host (usually "localhost"). Finally, you open yourdomain.com/wp-admin/setup-config.php in your browser and walk through WordPress's famous 5-minute installer, which sets up the database tables and lets you create your admin account.
Honestly, I haven't needed to do a manual installation in years. The last time was for a client with a very unusual server setup that didn't support one-click installers — and even then, the whole process took maybe 20 minutes. One-click installers do all of the above automatically and eliminate the possibility of typos in your database credentials (which, trust me, is the number one cause of "Error Establishing a Database Connection" messages). But if you're the kind of person who likes to understand how the engine works before you drive the car, now you know.
Your First 10 Minutes After Installing WordPress
This is the section that most WordPress tutorials either skip entirely or rush through, and it drives me crazy. The settings you configure in your first ten minutes directly affect your site's SEO, security, and usability going forward. Changing some of these later (especially permalinks) can break existing links and hurt your search rankings. So let's do this right, right now.
1. Set Your Site Title and Tagline
Go to Settings > General in your WordPress sidebar. At the top of this page you'll see two fields: "Site Title" and "Tagline." Your site title is self-explanatory — it's the name of your website, and it appears in browser tabs, search results, and (depending on your theme) in your site's header. Set it to whatever you want your site to be called.
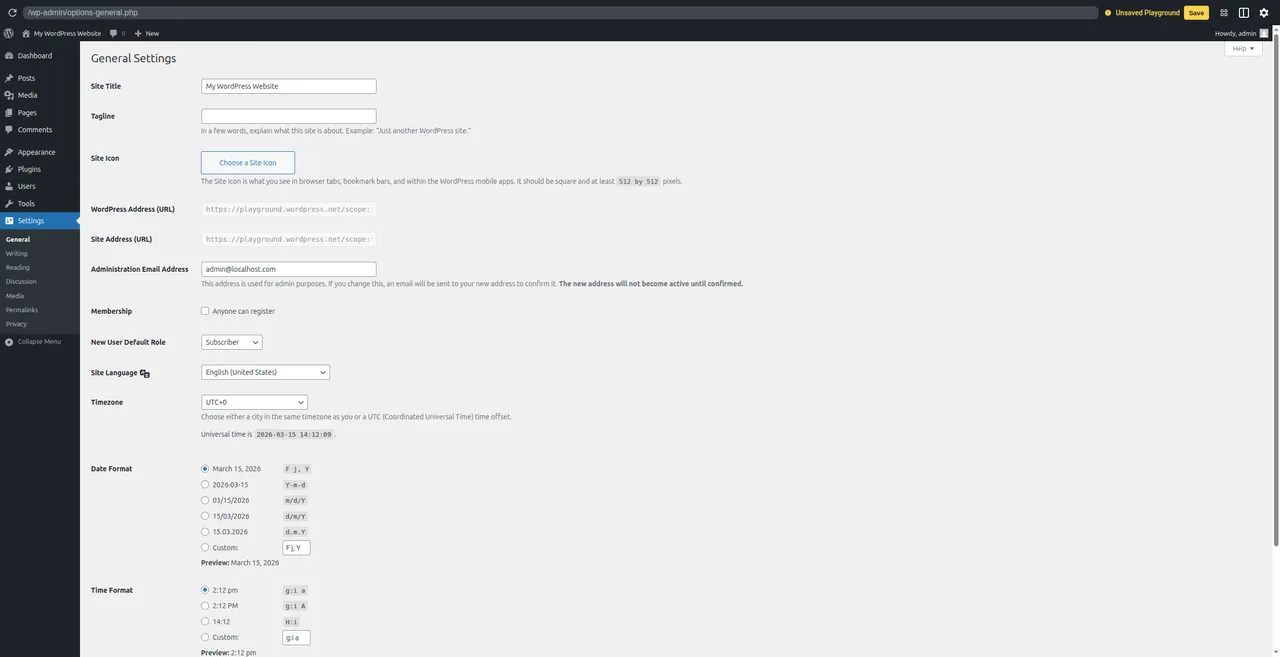
The tagline is what I want you to focus on. By default, WordPress sets it to "Just another WordPress site." You need to change this immediately. It shows up in search engine results next to your site title, and there are literally millions of WordPress sites out there that still have this default tagline because nobody told the owner to change it. Set it to a short description of what your site is about — something like "WordPress tutorials for beginners" or "Helping small businesses get online." Or leave it blank if you don't have one yet. Anything is better than the default.
While you're on this page, scroll down and set your Timezone to your local timezone. WordPress uses this for scheduling posts, displaying dates, and running automated tasks (like scheduled backups). If you leave it on UTC and you're in Amsterdam, your scheduled posts will publish at the wrong time. Also double-check that the "Site Address (URL)" fields use HTTPS, not HTTP — your SSL certificate should already be active if your host set it up during installation, which most do automatically now.
2. Configure Permalinks (Critical for SEO)
This is the single most important setting you'll change, and I need you to do it right now, before you publish a single post or page. Go to Settings > Permalinks.
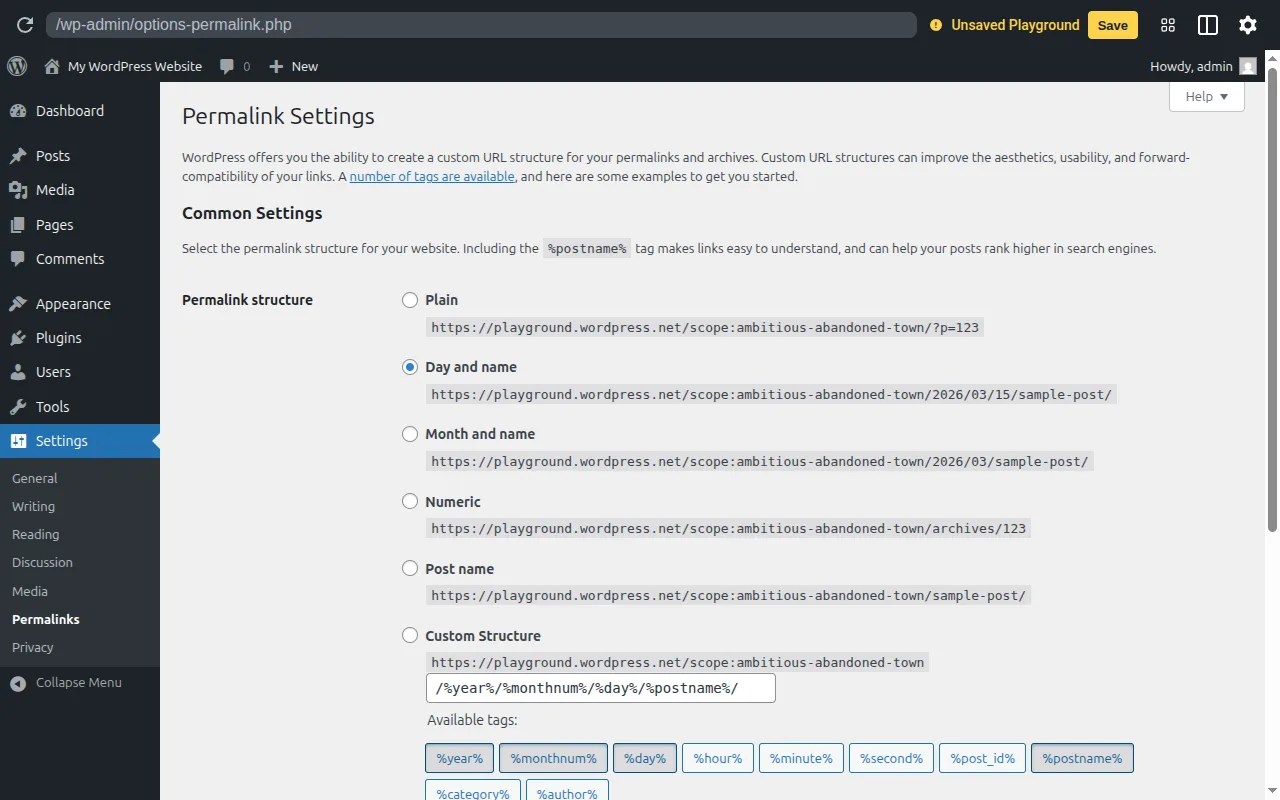
By default, WordPress uses a URL structure that looks like yourdomain.com/?p=123 — which is ugly, meaningless, and terrible for SEO. Nobody looking at that URL can tell what the page is about, and search engines prefer descriptive URLs. You want to change this to the "Post name" option, which creates URLs like yourdomain.com/how-to-install-wordpress. It's clean, readable, and includes your keywords naturally.
Select "Post name," scroll down, and click "Save Changes." That's it. But here's why timing matters: if you change your permalink structure after you've already published content, all your existing URLs change. Any links people have shared, any pages Google has indexed, any bookmarks — they all break. WordPress doesn't automatically set up redirects from the old URLs to the new ones. I've seen people change their permalink structure six months into running their blog and lose half their search traffic overnight. So do it now, before there's anything to break.
3. Delete Default Content
WordPress ships with sample content that's meant to show you what posts and pages look like, but you don't want any of it on your live site. Go to Posts > All Posts and delete the "Hello World!" post. Then go to Pages > All Pages and delete the "Sample Page." Finally, go to Comments and delete or trash the default comment by "A WordPress Commenter." Start fresh. You don't want placeholder content showing up when real visitors land on your site, and Google doesn't need to index a page that says "This is an example page. It's different from a blog post because..."
This takes about 30 seconds. Just hover over each item, click "Trash," and move on.
4. Choose a Theme
Your theme controls how your WordPress site looks — the layout, colors, typography, spacing, all of it. WordPress comes with a default theme (currently Twenty Twenty-Five), and it's actually pretty decent for a default. But most people want something that fits their specific needs better.
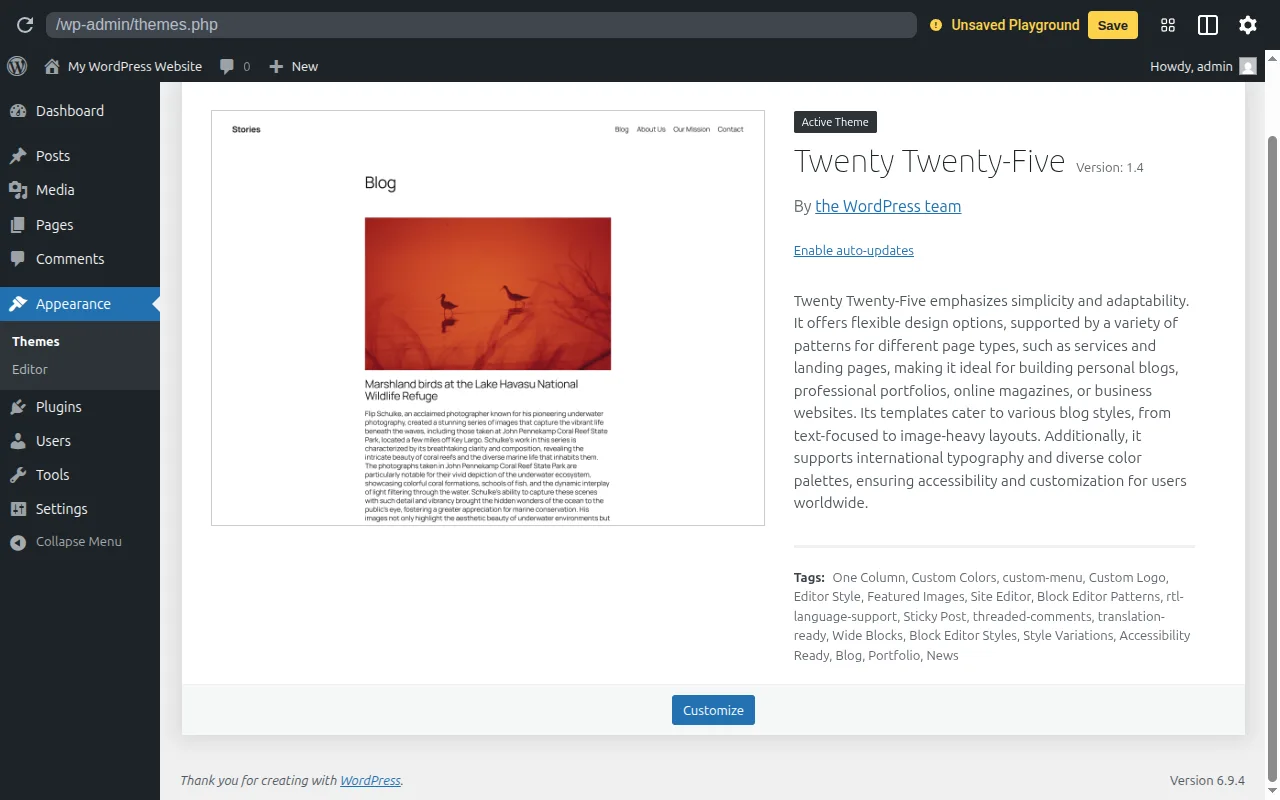
Go to Appearance > Themes and click "Add New Theme" to browse the free theme directory. There are thousands of options, which can be overwhelming. For beginners, I consistently recommend two themes: Astra and GeneratePress. Both are lightweight (they won't slow your site down), highly customizable, and work well with all the major page builders if you decide to use one later. Astra is the more popular of the two and has a huge library of starter templates. GeneratePress is slightly more developer-friendly but equally beginner-accessible.
Search for either one, click "Install," then "Activate." You can always change themes later — this isn't a permanent decision. For a deeper dive into choosing the right theme, check out my WordPress themes guide.
5. Install Essential Plugins
Plugins add functionality to your WordPress site — things like SEO tools, security features, contact forms, and performance optimization. Go to Plugins > Add New to browse and install plugins.
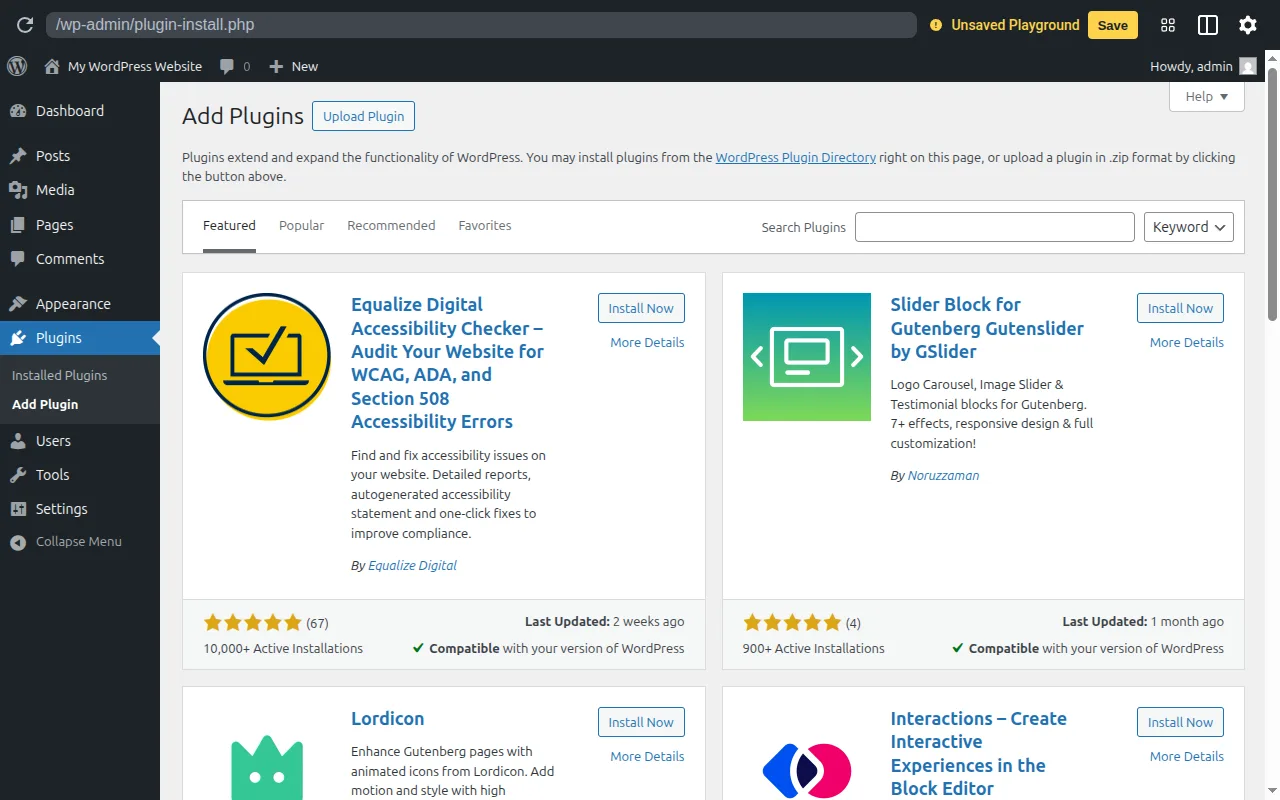
Here are the five plugins I install on every single WordPress site I build. These aren't optional nice-to-haves — they're the baseline for a well-functioning WordPress site:
- Yoast SEO (or Rank Math) — Helps you optimize every post and page for search engines. Adds meta descriptions, generates sitemaps, and gives you real-time SEO suggestions as you write. Absolutely essential.
- LiteSpeed Cache (or WP Super Cache) — Caching dramatically speeds up your site by serving saved copies of your pages instead of generating them from scratch on every visit. If your host uses LiteSpeed servers (Hostinger does), use LiteSpeed Cache. Otherwise, WP Super Cache is a solid free alternative.
- UpdraftPlus — Automated backups. You can schedule daily or weekly backups to Google Drive, Dropbox, or other cloud storage. When something goes wrong (and eventually, something will), a recent backup is the difference between a 5-minute fix and a complete disaster.
- WPForms Lite — A drag-and-drop contact form builder. Every website needs a contact form, and WPForms makes it dead simple to create one. The free version handles most use cases.
- Wordfence Security — A firewall and security scanner that protects against brute-force attacks, malware, and other threats. It also alerts you to vulnerabilities in your installed plugins and themes.
To install any of these, type the name in the search bar on the Plugins > Add New page, click "Install Now" next to the correct plugin (check that it has a high number of active installations and good ratings), and then click "Activate" once it's installed. Each one has a setup wizard that walks you through the initial configuration.
One word of caution: don't go plugin-crazy. Every plugin you add increases your site's load time a little bit, adds potential security vulnerabilities, and makes updates more complex. I've seen WordPress sites with 40+ plugins that take 15 seconds to load. Install what you need, skip what you don't, and regularly audit your plugin list. If you haven't used a plugin in months, deactivate and delete it. For more recommendations, see my complete WordPress plugins guide.
Hosting-Specific Installation Guides
While the general process is the same everywhere, the interface and exact steps vary from host to host. Here's a quick comparison of how WordPress installation works on the three hosts I recommend most often:
| Feature | Bluehost | SiteGround | Hostinger |
|---|---|---|---|
| Auto-install on signup | Yes | Yes | Yes |
| Dashboard type | Custom | Site Tools | hPanel |
| One-click installer | Built-in | Built-in | Built-in |
| Free SSL setup | Automatic | Automatic | Automatic |
| Time to install | ~2 min | ~3 min | ~2 min |
| Free domain included | Yes (1st year) | No | Yes (1st year) |
| Staging environment | Yes | Yes | Yes (paid plans) |
Honestly, I think Bluehost's installation experience is the smoothest I've used. WordPress is literally ready to go the moment you finish signing up — there's no separate installation step at all. You complete the checkout, answer a few questions about what kind of site you're building, and you're dropped right into the WordPress dashboard. It doesn't get easier than that.
SiteGround is also excellent but has one extra step: after logging into Site Tools, you navigate to WordPress > Install & Manage, fill in your site details, and click Install. It takes about a minute longer than Bluehost but gives you more control over the installation settings. SiteGround's dashboard is also the most polished of the three — once you learn where things are, it's genuinely nice to use.
Hostinger falls somewhere in between. Their hPanel guides you through WordPress installation during the initial setup wizard, and the whole thing is designed to be beginner-friendly. They also have the lowest prices of the three, which makes them a popular choice for people building their first site. For a detailed breakdown of each host, check out my WordPress hosting comparison.
Troubleshooting Common Installation Problems
Don't panic. In 20 years of working with WordPress, I've seen every error message there is, and they're almost always fixable. Here are the most common issues people run into during or right after installation, along with what to do about each one.
Error Establishing a Database Connection
This is the most common WordPress installation error, and it means WordPress can't connect to its database. If you used a one-click installer, this usually fixes itself within a few minutes — the database might still be setting up. Wait five minutes and refresh. If you did a manual installation, the problem is almost certainly wrong credentials in your wp-config.php file. Double-check the DB_NAME, DB_USER, DB_PASSWORD, and DB_HOST values against what your hosting panel shows for the database you created. Even a single character off — a trailing space, a wrong capitalization — will cause this error. If everything looks right, contact your hosting support and ask them to verify your database credentials.
White Screen of Death
You try to load your site and get a completely blank white page — no error message, no content, just white. This is usually caused by a PHP error that WordPress is suppressing. The most common cause right after a fresh installation is a PHP memory limit that's too low. You can try adding define('WP_MEMORY_LIMIT', '256M'); to your wp-config.php file, but honestly, if you're hitting memory limits on a fresh install with no plugins, something else is wrong. Contact your hosting provider — they can check the PHP error logs and usually fix the issue in minutes. This is what you're paying them for.
Can't Access wp-admin
You go to yourdomain.com/wp-admin and get a 404 error, a redirect loop, or a page that won't load. First, make sure you're using the right URL — it's your actual domain, not the temporary one your host might have given you during setup. Try yourdomain.com/wp-login.php as an alternative. Clear your browser cache and cookies, or try opening the URL in an incognito/private window. If your domain was just registered, DNS might not have propagated yet — this can take up to 48 hours, though it's usually much faster. Try accessing your site using the server's IP address instead (your host can give you this) to confirm WordPress is actually installed and running.
SSL Certificate Not Working
You see a "Your connection is not private" warning, or your site loads with HTTP instead of HTTPS. Most modern hosts set up SSL certificates automatically during WordPress installation, but sometimes it takes a few hours for the certificate to activate. If it's been more than 24 hours, go to your hosting control panel and look for "SSL" or "Security" — there's usually an option to force-enable or reinstall the SSL certificate. Once SSL is working, make sure your WordPress URLs use HTTPS: go to Settings > General and confirm that both "WordPress Address (URL)" and "Site Address (URL)" start with https://. A plugin like "Really Simple SSL" can handle the remaining redirects automatically, but on most modern hosts you won't need it.
Installation Stuck or Timed Out
The progress bar froze, the page timed out, or you got an error mid-installation. Before you try installing again, check whether WordPress was actually installed by navigating to yourdomain.com/wp-admin. If the login page appears, you're fine — the installer completed but the confirmation page failed to load. If WordPress wasn't installed, most one-click installers will let you retry without issues. On some hosts you may need to delete the failed installation first (look for an "uninstall" or "remove" option in the installer) before trying again. If you're stuck, hosting support can typically clean up and reinstall in under five minutes.
What to Do Next
You've installed WordPress and configured the essential settings. Your site is live, functional, and ready for content. Here's where to go from here, depending on what you want to learn next:
- How to Make a WordPress Website — The full beginner guide that walks you through creating pages, setting up navigation, building your homepage, and launching your site. This is the logical next step if you're building from scratch.
- WordPress SEO Guide — How to set up Yoast SEO properly, create a sitemap, submit it to Google Search Console, and start ranking in search results. The sooner you get SEO right, the better.
- WordPress Security Guide — How to protect your site from hackers, set up two-factor authentication, configure your security plugin, and follow best practices that prevent 99% of attacks.
- WordPress Speed Optimization — How to make sure your site loads fast, which matters for both user experience and search rankings.
- Start Here — The complete learning path from absolute beginner to confident WordPress site owner. If you want a structured, step-by-step journey, this is your roadmap.
- Build a WordPress Site with AI — If you would rather let AI do most of the heavy lifting on theme choice, layout, and first-pass content, this is the modern AI-powered workflow.
The hardest part of building a WordPress site isn't the technical stuff — it's making decisions and actually getting started. You've already done the hardest part by getting WordPress installed and configured. Everything from here is about building on that foundation, one step at a time.
Frequently Asked Questions
Can I install WordPress on my computer?
Yes, and it's a great way to experiment without affecting a live site. Tools like Local by Flywheel (now just called "Local") make this incredibly easy — you download the app, click "Create a New Site," and you have a fully functional WordPress installation running on your computer in about 60 seconds. MAMP and XAMPP are older alternatives that work similarly but require more manual setup. Local WordPress installations are perfect for testing themes and plugins, learning how WordPress works, or building a site before you're ready to buy hosting. The site runs on your computer and is only accessible to you — nobody else can see it until you move it to a live server.
Can I have multiple WordPress sites on one hosting account?
It depends on your hosting plan. Most basic/starter plans only allow one website. Mid-tier and higher plans from Bluehost, SiteGround, and Hostinger typically allow unlimited websites on a single account. Each WordPress installation is separate — different database, different files, different admin login — they just share the same server resources. If you're planning to run multiple sites, make sure you choose a hosting plan that supports it, and keep in mind that all those sites share the same CPU and memory allocation, so performance can suffer if any single site gets a traffic spike.
How do I update WordPress?
WordPress shows update notifications right in your dashboard. Go to Dashboard > Updates to see available updates for WordPress core, your themes, and your plugins. For minor updates (like 6.4.1 to 6.4.2), WordPress handles these automatically by default — they're security patches and you want them applied immediately. For major updates (like 6.4 to 6.5), you'll see a button to update manually. Always back up your site before a major update, and ideally test it on a staging site first. Most of the time updates go smoothly, but plugin compatibility issues can occasionally cause problems. If anything breaks after an update, your backup is your safety net. For a look at what's coming in the next major release and why it has been delayed, see my WordPress 7.0 release guide.
Is WordPress really free?
Yes — WordPress itself is 100% free, open-source software. You can download it from wordpress.org without paying a cent. What costs money is everything around it: hosting (typically $3-30/month), a domain name ($10-15/year), and any premium themes or plugins you choose to buy. You can absolutely build a fully functional, professional-looking website using only free themes and free plugins — many successful sites do exactly that. The paid options give you more features, more support, and sometimes better design, but they're never strictly necessary. Don't confuse WordPress.org (the free software) with WordPress.com (a hosted service that has both free and paid plans) — they're related but different. My What Is WordPress guide explains the distinction in detail.
Can I install WordPress without a domain?
Yes. Most hosting providers give you a temporary URL during setup — something like server123.hostingprovider.com/~username or a randomly generated subdomain. You can install WordPress on this temporary URL and start building your site while you figure out your domain name. Once you register and connect a domain, your host can help you switch the site over to the real URL. It's also possible to access your site directly via the server's IP address. If you're using Local by Flywheel for local development, domains aren't even part of the equation — your site runs on localhost. So yes, don't let the lack of a domain name stop you from getting started.
What version of PHP do I need?
WordPress officially recommends PHP 8.0 or higher, with PHP 8.2 or 8.3 being the current sweet spots for performance and compatibility. PHP 7.4 is the bare minimum and works, but it reached end-of-life in November 2022, meaning it no longer receives security updates. Most reputable hosting providers run PHP 8.1+ by default on new installations, so you probably don't need to worry about this. If you're on an older hosting account and want to check, look for "PHP Version" or "PHP Configuration" in your hosting control panel. Upgrading PHP is usually a one-click operation in your hosting dashboard and can noticeably improve your site's performance — I've seen speed improvements of 20-30% just from upgrading from PHP 7.4 to 8.2.

Written by ZTW Team
Our team tests and reviews WordPress products to help beginners make confident choices.
Learn more about our team →You might also like
How to Make a WordPress Website — Complete Beginner's Guide (2026)
Learn how to build a WordPress website from scratch in 2026. I walk through every step with screenshots — hosting, setup, themes, plugins, and your first content.
postHow to Choose a Domain Name for Your WordPress Site
Picking a domain name is one of the first decisions you'll make. I share practical tips for choosing the perfect domain, where to register it, and common mistakes to avoid.
postWhat Is WordPress? A Beginner-Friendly Explanation
WordPress is the world's most popular website builder, powering over 40% of all websites. In this guide, I'll explain exactly what WordPress is, how it works, and why it's the best choice for beginners.
postWordPress.com vs WordPress.org — What's the Difference?
Confused by WordPress.com and WordPress.org? I break down the key differences, pros and cons, pricing, and which one is right for you as a beginner.